Setting up your Event
Creating an Event
- Navigate to Events and click the Add Event button.
- Give your Event a name and click Continue
The Event Editor
The Event editor allows you to fully manage all aspects of your Event, from branding and content through to viewer registration and reporting.
Changes made in the Event editor remain in draft state until the Publish button is clicked.
Details
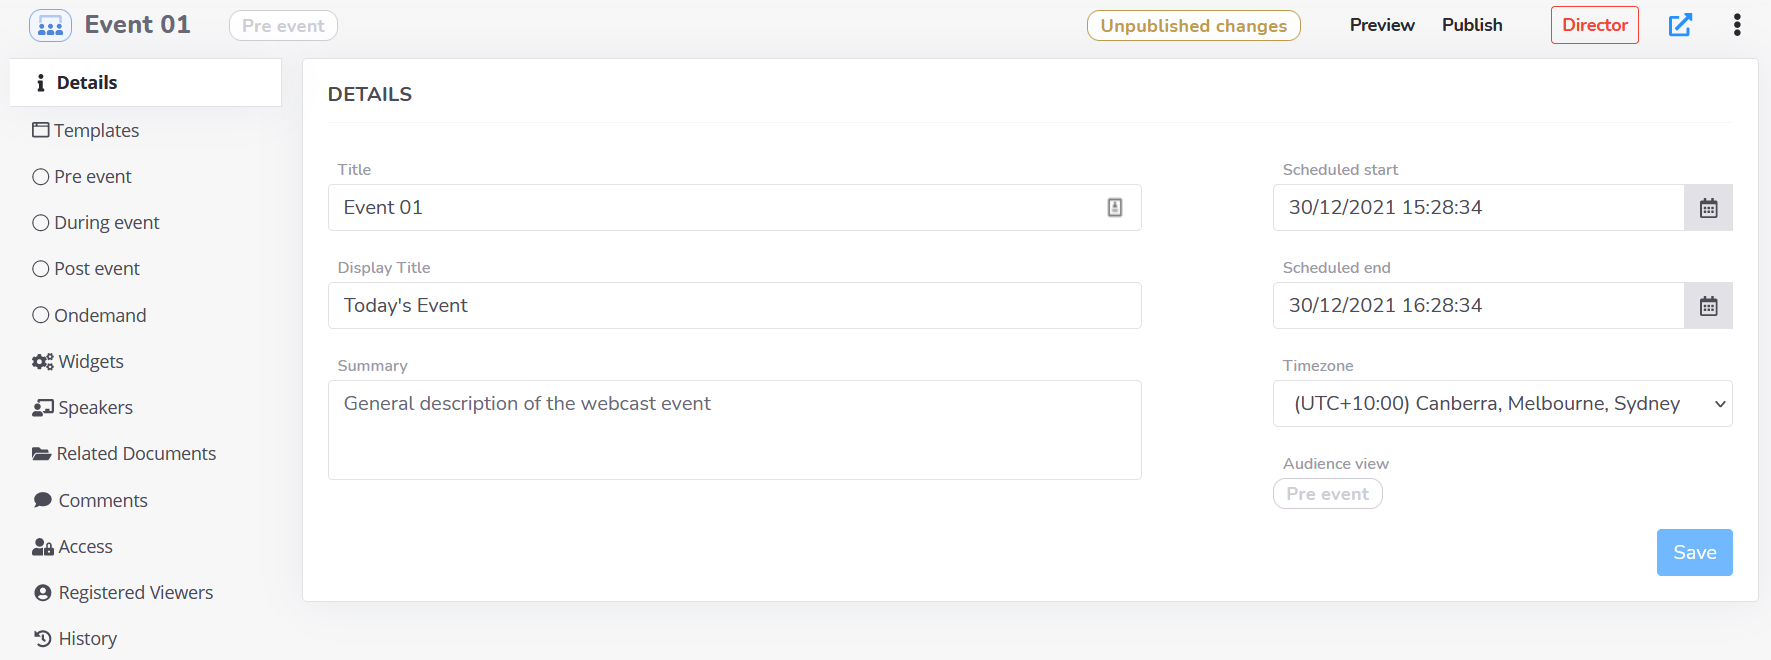
The Details tab allows you to set some of the basic information for your Event.
-
Title: The name of the Event as displayed within the Viostream platform.
-
Display Title: The name of the Event as displayed to viewers.
-
Summary: Text that appears underneath the Player inside the published Event.
-
Scheduled start: Date and time for when the Event will commence.
-
Scheduled end: Time of expected Event conclusion.
-
Timezone: The timezone of the Event
tipEvent times will always be displayed in the viewer's local timezone, so there's no need to worry about time conversions.
-
Audience view: Displays the current Event state.
Templates
Templates are used to apply reusable styles and branding to your Event. To change the current template, select a template from the dropdown list and click Save.
The Template editor allows you to apply powerful customisations using CSS. Our Customer Success team is available to help you get started with your first Template - please reach out via the Live Chat.
Event States
There are four Event States within Viostream's Events. These can be independently customised to display different content via the Pre event, During event, Post event, and Ondemand tabs.
- Asset Type (Pre and Post only): Select either a static Image or a Media from your Library to display as a placeholder.
- Image Asset (Pre and Post only): Upload an image from your drive to use as the static image.
- Media Asset: Select a video from your Library or a Live stream (During only) to display on the page.
- Description: Either use the summary text from the Details page, or select to add state-specific custom text.
For more information about the four Event states, see the Running your Event guide.
Widgets
Widgets are interactive elements that can be added to your Event to engage viewers.
Available Widgets include:
- AI Media Captions
- CoverItLive
- Google Maps
- Kahoot.it
- Menti
- Pigeonhole Live
- Qualtrics
- Scribble Live
- Slido
- Snapforms
- Stackla
- SurveyGizmo
- Wordly.ai
Contact the Customer Success team via the Live Chat for more information on setting up widgets, or if you would like to request a new widget.
Speakers
Speakers allows you to input biographies of the presenters or hosts of your Event. Simply click the Add button to add a new Speaker. You can then customise the following fields:
- Name: The name of the speaker.
- Biography: A short description of the speaker.
- Image: An image of the speaker.
To edit an existing Speaker, click the icon, or to delete a Speaker, click the icon.
Related Documents
Related Documents can be added to your event, allowing viewers to download presentation decks, results announcements, or any other collateral you wish to distribute.
To upload a Document, use the Upload document link on the right of the page. Documents will appear in a list showing their title, and date uploaded.
You can download a Document by clicking the icon, edit a Document title by clicking the icon, or delete a Document by clicking the icon.
Supported Document Formats
| Document type | File extension(s) |
|---|---|
.pdf | |
| Images | .gif .jpg .jpeg .png |
| MS Office | .doc .docx .ppt .pptx |
| Text | .txt |
Related Documents are not displayed during the pre-event state, so you don't need to worry about viewers accessing them before the event starts.
Access
You can enable Restrictions Profiles and well as Viewer Registration or Single Sign On via the Access tab.
Restriction Profiles for Events work the same way as for individual videos. For more information on setting them up, please refer to the restriction profiles help document.
To enable a Restriction Profile for an Event, simply toggle the setting on, choose a profile and click the Save button.
You can only assign a single Restriction Profile to an Event.
Viewer Registration allows you to collect information including name and email address from viewers before they can access your Event.
To enable Viewer Registration, toggle the Enable Viewer Registration setting on and then select the Viostream registered viewers radio button. You can optionally configure the following settings:
| Setting | Description |
|---|---|
| New registrations require approval prior to activation | If enabled, viewers will need to be approved by an admin before they can access the Event. |
| Disable email activation | If enabled, viewers will be able to access the Event without having to confirm their email address. |
| Enable Social Sign In | If enabled, viewers can sign up with Google, Facebook or LinkedIn. |
If you require approval for new registrations, you will receive an email when a new viewer signs up for your Event. To approve the viewer, simply navigate to the Registered Viewers tab, select the Pending Viewers filter, and click on the Approve button next to the viewer's name.
Registered Viewers
Registered Viewers allows you to view and manage the viewers that have registered for your Event. Viewers have three different states:
- Active Viewers: These are viewers that have been approved and are allowed into the Event.
- Pending Viewers: These are viewers that have not yet been approved or rejected.
- Suspended Viewers: These are viewers that have been denied access to the Event.
To change the state of a Registered Viewers, simply click the icon next to their name, update the Status field, and click the Save button.
You can dowload your list of Registered Viewers as a csv file by clicking the CSV Export link at the bottom of the page.
Previewing Your Event
To see a preview of all the changes you've made to your Event, click the Preview button at the top of the page. This will open a new tab showing what your Event will look like to viewers in the Pre state. To view a preview of the other states, use the icon at the top right of the page and select the state you wish to preview.
Publishing Your Event
When you are happy with your Event, click the Publish button at the top of the page. This will make your Event and click Yes to confirm. This will set any changes you have made live.
Sharing Your Event
To share your Event, click the icon at the top of the page. This will open the published Event in a new tab where you can copy the URL to share with viewers.
Deleting Your Event
To delete your Event, click the icon at the top of the page, click Delete Event, and click Yes to confirm.
Deleting an Event is permanent and cannot be undone. You will lose access to all data associated with the Event including any Registered Viewers and Reports.